How to set up your mountain bike - basic MTB adjustments explained
Nail the basics for better performance and comfort.

Mountain bikes have a dizzying array of adjustment points and you'll need a proper setup to maximise your time in the saddle. Failure to do so will result in a world of discomfort and poor dynamics because the best mountain bikes are an extension of the body. In this feature, we’ll highlight the main points of adjustment and explain how to set things up for your needs and proportions.
- How to start mountain biking
- Essential mountain bike skills for beginners
- Gravel bike vs mountain bike: what are the differences?
Although mountain bikes share several adjustments found on road and gravel bikes, they can be a little more complicated when it comes to things like suspension. As mountain bikes are constantly negotiating more technical terrain, making sure everything is lining up with your body and that your weight is distributed properly is hugely important.
Mountain bikes also require a slightly different toolset. To achieve a good setup, you’ll need a good set of mountain bike tools including Allen keys and a shock pump at the very least. It’s also wise to get hold of a torque wrench to ensure every bolt is tightened to specification and that your bike is safe to ride.
Below are the key points of adjustment that every rider should address when setting up a new bike. However, this advice should be seen as a base rather than gospel truth – think of it as a blueprint you can tweak as you get fitter and more comfortable. From there, you can experiment and dial your bike in perfectly. We test loads of mountain bikes at off.road.cc, and this is the exact process we go through before riding any test bike.
If you’re unsure of anything or struggling to find a setup that works for you, head over to a professional bike fitter who’ll get you rolling in comfort in no time.
Adjust your saddle height
The height of your mountain bike saddle plays a huge role in your comfort on the bike and how efficiently you use your leg muscles to transfer energy into forward momentum. If you get this one point wrong over any other in this guide, you’ll potentially be setting yourself up for injury.

2024 norco sight c1 seat post.jpg, by Liam Mercer
There’s a single, surefire method of determining your saddle height, and it’s easy to achieve. All you’ll need is the correct Allen key for your seat tube collar bolt and a wall.
With your bike leaned against a wall and the dropper post in its lower position, stand over the bike and raise the saddle using the lever under the left-hand side of your handlebar. Sit on the saddle and lower a pedal to its lowest position by backpedalling.
From here, put your heel on the pedal and your leg should be straight with a locked knee. If this isn’t something you’ve achieved, raise or lower your seatpost to get there. With a locked knee, move your foot rearwards into a natural pedalling position and you should have a slight bend in your knee – this is the correct saddle height. With the saddle height set, it’s worth measuring the distance between the bottom bracket and the top of the saddle so you can transfer the saddle height from bike to bike without having to go through this method each time.
Saddle position and angle
But wait, there’s more. Apart from saddle height, there are two points of adjustment. The saddle position on the rails and its angle affect comfort and weight distribution over the bike.
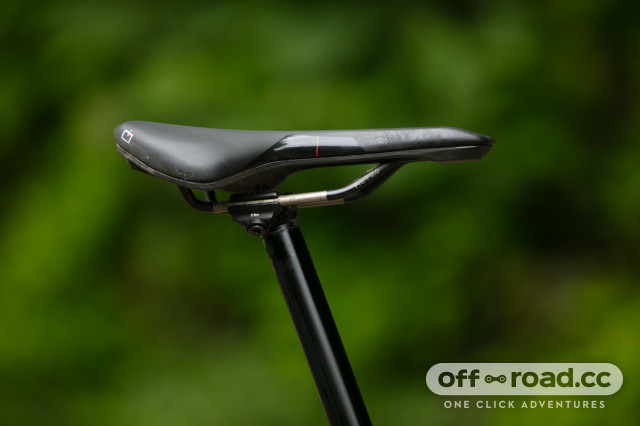
2024 proxim nembo saddle profile.jpg, by Liam Mercer
A saddle has neat markers along its right-side rail that denote the position of the seat post clamp, which holds the saddle in place. Sliding the saddle further on the rails straightens the rider’s back while shifting weight (while sitting on the saddle) centrally on the bike. This also opens up space over the back of the bike, allowing more room for big rearward body movements when descending.

2020 Cotic Rocket Gold-12.jpg, by Liam Mercer
Seat posts provide angle adjustment in the saddle and the best angle to start with is zero degrees or completely flat. From here, you should only adjust the angle by a degree or two and small changes can make a big difference. Tipping the nose down a bit provides more support when climbing while accounting for sag on a full-suspension mountain bike. It can shift your body weight onto your hands, however, and that’s not comfortable.
Saddle setup is a whole subject in itself and if you’re looking for performance or finding yourself in pain after a ride, it’s well worth checking in with a professional bike fitter.
Bar roll
Mountain bike handlebars are rarely dead straight. As well as width, upsweep and backsweep can affect comfort on the bike, as well as move your body weight when standing or sitting. Bar roll refers to how the bar sits with the stem and its rotation.

Atherton A170 handlebar, by Suvi loponen
Bar roll effectively tweaks a handlebars upsweep (the angle at which the grips rise from the centre of the bar) and the backsweep (the angle at which the grips come back from the centre of the bar). Rolling the bar forward will reduce the back sweep and increase the upsweep. Doing so will place more weight over the front of the bike and place the rider in a more aggressive position with the elbows out more.
Rolling the bar backwards might make for a more comfortable cockpit as the back sweep is greater and the grips will be placed in a more natural and form-fitting position. However, it may become more difficult to keep weight balanced, and when the front wheel when necessary.
Brake lever position
With the bars set in the desired position, your brakes are the next port of call, and setting the position or the spot where the lever sits in front of your hand is super easy. Ideally, you’ll be using one-finger braking but you want to eke out all of the leverage from the lever.
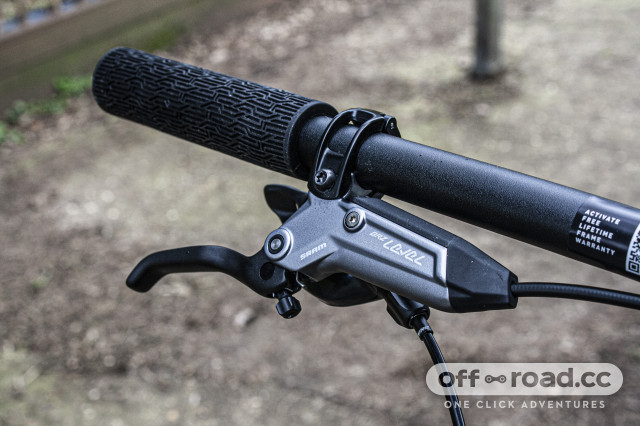
Specialized Epic Comp brake lever, by Aaron Borrill
Nearly all brake levers on the market have a sharp (but comfortable) curve towards the end of the blade and that’s where you want your finger to sit. This will give you all the leverage the brake can provide while supplying a stable and secure grip on the lever. Now, it’s time to move on to the angle of the lever.
Brake lever angle
Your brake levers are another key area that plays a role in general on-bike comfort. Although, several factors dictate how your brake levers might be angled, as well as the personal aspect.
Many modern mountain bike brakes come with adjustments that allow the user to dial in the brake bite point and lever reach on top of the angle. Those two features are more personal preferences, so for now, we’ll stick with the lever angle as every brake on the market provides this adjustment.

2024 orbea laufey brake lever.jpg, by Liam Mercer
The rule of thumb is that your brake lever should be in line with your arm as it grips the bar in its most frequent position. So if you ride a downhill bike and only go downhill, your levers might sit lower on the bar and the same goes for cross-country riders with a particularly forward weighted bike.
Using this rule should place your levers in a natural feeling position but it acts as a great base to work from and make tweaks should you feel the need.
There has been a trend of raising the brake levers led by French supremo, Yoann Barelli, who rides his levers almost completely flat. The thought behind here is that if your fingers are pointing in the direction of travel, your vision will naturally follow. As we all know, looking where you’re going is ridiculously important.
Now it’s just a case of matching the angles of both brake levers. Some even prefer a ‘moto’ style where the right brake is higher and the left lower which is a reference to how some motocross riders position their clutch and front brake levers.
Stack (stem) height
Your stack height refers to where your stem is clamped on your steerer tube and that’s done with spaces that sit above and below the stem on the steerer. With spacers typically being 5mm and 10mm in depth, most steerer tubes provide a 20 to 35mm range of adjustment to play with. It’s a simple thing to adjust, done by removing the top cap, loosening the stem and removing it – then rearranging the spacers underneath and above the stem to your preference.

2024 deviate highlander 2 stem.jpg, by Liam Mercer
And the great facet of stem height is that there’s no one set rule. Lowering the stack will push weight towards the front of the bike which is great for cornering grip, and stability when climbing but because weight is forced forwards, the bike might not feel as confident when descending, especially when the terrain gets steep.
Raising the stem will improve confidence on the descents but you’ll have to consciously weight the front when cornering and the front wheel will be prone to lifting when pedalling uphill. The beauty is that stem height is a very easy adjustment to make, so it can be tweaked according to the trails you're riding.
Stack height shouldn’t be confused with bar rise. Due to a mountain bike’s head angle, raising the stem will bring the handlebar closer to the rider. Choosing a handlebar with a higher rise will adjust the position of the grips, bringing them higher without being influenced by the head angle.
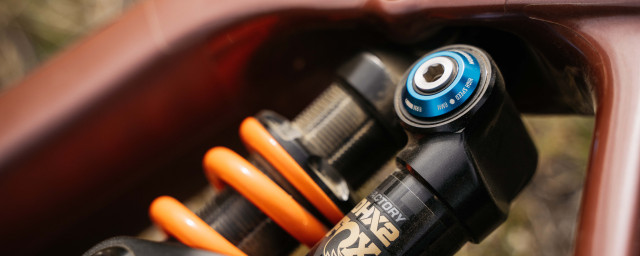
Suspension setup
With the bike’s solid contact points adjusted, your suspension needs to be set up to account for your weight. Neglecting to set up your suspension will make a perfectly set-up bike ride awfully. However, suspension tuning is a huge can of worms that should be delved into to make it work at its very best for your riding and we’ve got a how to set up your mountain bike suspension guide that dives deep into the dials, but for now, let’s talk about sag.

2022 shock pump.jpg, by Liam Mercer
Sag is the measurement of how much the suspension sits in its travel when weighted and it’s a great thing as it allows the suspension to extend into holes while acting as the primary adjustment of all suspension components, air or coil sprung. Correct sag will open up all of the travel while providing good support. Too little sag will limit the amount of travel the suspension component can use and make the bike feel harsh whereas too much will make the bike feel very squishy, and it’ll bottom out the suspension frequently.

2022 sag position.jpg, by Liam Mercer
Now, setting up your sag is a simple task, especially if your bike is equipped with air suspension and ideally, you’re looking for 25-30 per cent sag with the former providing a firmer ride and the latter, a softer ride.
To achieve your sag follow these easy steps:
1. With your bike leaned up against a wall
2. Get into the attack position.
3. Bounce the bike a little and slide the o-ring on your fork or shock to the wiper seal but be careful not to move the suspension as you do so.
4. Then, carefully get off the bike to not compress the suspension and measure the distance between the o-ring and wiper seal. With a tape measure and a quick bit of maths (percentage of the travel of your fork, or stroke of your shock), determine whether or not the o-ring is at the 30 per cent mark, or wherever you want your sag set. If the measurement is larger, you’ll need to add more air, if it’s smaller, you’ll need to release some pressure.
You might also like:
Author block