How to bikepack on a budget: complete bivvy kit under £100
[Updated 04.01.2022]
Bikepacking is a great, low-cost way to have an adventurous holiday or break without needing to go very far from home, but the initial outlay on proper bikepacking kit can be costly if you just want to give it a go. However, it's possible to get everything you need to bivvy and transport all your kit for under £100 if you know a few tips and tricks...
- How to go bikepacking: a beginner's guide to getting started
- Bikepacking basics: bike repair and first-aid kit
- 13 of the best ways to attach gear to your mountain or gravel bike
While having a fancy setup with lightweight frame bags, tents, tarps and all the other kit you might associate with the bikepacking 'rigs' that litter Instagram is certainly an option, it's easy to forget that bikepacking is just about carrying the stuff you need to be able to ride somewhere, sleeping overnight and then riding on in the morning, keeping yourself fed and warm throughout.
The basic, budget bikepacking kit list
If you're new to bikepacking, you're unlikely to be taking on a multi-day epic across uninhabited areas or in foul weather. If you're sensible, you'll choose a few days with good weather in a location that feels remote without necessarily being so - which means you don't need any extreme levels of kit.
We'll break this guide down into simple sections of sleeping, eating and transporting your kit.
Cheap sleeping kit for bikepacking
Sleeping outdoors is what makes bikepacking; waking up somewhere you could only get to under your own power, far away from anyone else is a pretty special experience. It can also be fairly unpleasant if you get it wrong; being cold, wet and sleep-deprived will not fill you with fond memories of your adventure.
In essence, you need to stay warm with a sleeping bag, dry with a bivvy bag or tarp and be comfortable with a sleeping mat. It's possible to spend an absolute fortune on high-zoot equipment here (and it's probably the area that you should) but happily, for budget-minded bikepackers, there's another user group that stays outdoors in all conditions and is fond of getting rid of its old gear at knockdown prices - the military!
Yep, army surplus equipment is your best friend here. It's cheap, easy to find and works well, though it's not usually lightweight. There are different grades of surplus kit; new and unused, issued but with very light use and finally, obviously used. We'd opt for the middle of those from a price/performance point of view, but it's a good idea to actually go to the shop in person and inspect what you're getting as it can vary wildly.
While a high-end bivvy bag can cost hundreds of pounds, a surplus British Army bag - made entirely from breathable Gore-Tex, no less - will cost around £30-40. Make sure you inspect the seams on the inside of the bag to check for any tape coming up and have a good look for any holes. Even on a hot, dry weather trip, putting a bivvy bag under your sleeping mat and bag will minimise how soggy you get from morning dew too.
It's a similar story with sleeping bags - a three-season bag will cost about £20-£40 - but it's worth being a bit more discerning here as the military bags can be rather heavy. If you're sleeping out in the summer, you don't need a bulky, warm bag - a cheap £35 item will do the trick. We've had good experiences with cheaper bags from brands such as Snugpak. Look at the weight and the temperature comfort rating when making your choice - and make sure it comes with a decent stuff-sack so you can get it down as small as possible.
Alpkit does a very good range of affordable sleeping mats - and other outdoor gear - but army surplus will often have some even cheaper choices for around £20. We'd always go for an inflatable mat over the foam rolls - they're more comfortable and much easier to stow on your bike or bag.
If the weather looks a bit rubbish, a tarp is also a good thing to have. Once again, military surplus comes through again with the classic basha poncho. This is a cunning bit of kit that can be used as a waterproof poncho to cover yourself or your kit, complete with a head hole and hood in the middle.
They're square in shape and also have eyelets around the edges, so you can use the drawcord of the hood to tie up the head hole and then use it as a waterproof groundsheet or tarp. Once again, it's not the lightest compared to a high-end tarp but they're cheap - £20 or so - and effective.
Cheap ways to eat and cook when bikepacking
Cooking a meal before you bed down or having a brew in the morning is the quintessential bikepacking image, so obviously you'll need a stove and cooking equipment as a minimum? No so. All that stuff is expensive and takes up loads of space and weight, which is the enemy of the budget bikepacker.
If you plan your route so that you can get a meal (and a pint) in a pub in the evening before riding on to your sleeping location, do that. The same goes for your breakfast - getting a nice coffee and breakfast in a cafe means you don't need to lug any extra kit around, which will make life much simpler.
That said, if your planned route doesn't allow you to do that, try to keep things as minimal as possible. MSR's Pocket Rocket 2 stove is an affordable, lightweight and functional bit of kit, but there are knock-off designs for even less than the £35 asking price of one of those, while a mini gas cylinder is around a fiver.
To cook in, army mess tins are very cheap - £5 - made from lightweight aluminium and nest inside each other so you can fill them with the stove and gas plus food and other bits and bobs. Don't be tempted by the military hexi solid-fuel stoves - beyond being a fire hazard with the potential to scorch the ground you use them on, they're dirty and inefficient.
For cutlery, take a spoon - and only take food that can be eaten with a spoon. Just use one from your kitchen - titanium cutlery is barely any lighter so there's just no point unless you really, really want to save a whopping 20g or so.
Anything that involves adding boiling water to another thing is a good start for food - couscous, noodles or pasta in a packet all have a decent carb kick and are all much cheaper than meals in a bag.
Make sure you snaffle some single-serving salt and pepper from the next service station you visit to season things up - the same goes for UHT milk cartons if you like a bit in your tea or coffee. We'd always take some instant coffee and leave the Aeropress/espresso pot at home unless you're the sort of type that can't live without fancy bean juice of a morning. Having less weight to carry will be far more enjoyable than a single brew that you could have had at a cafe later.
Make sure you take oodles of water - you'll really go through it for cooking, cleaning and drinking, especially in warm weather. Fill up your water bottles and/or hydration pack bladder whenever you get the chance. Trying to get your water from wild sources is a poor idea unless you're somewhere uninhabited and can filter and boil it before use. Agricultural runoff can pollute water that looks perfectly fine - you probably aren't carrying enough toilet roll to deal with the results.
Cheap ways to carry your bikepacking kit
While a fancy frame bag made from lightweight ripstop sailcloth will do the job of carrying all the kit you need, the humble rucksack will also do that job and you've probably got one kicking around somewhere, making it a good go-to option that's free or very cheap.
The downside of a rucksack is that if it's heavily laden it'll be sweaty and uncomfortable, which is why it's best to try and stuff as much bulky stuff on your frame as possible. Lidl has done some very cheap bikepacking bags and Planet-X and others have cheap but functional enough kit, but just strapping your kit to the bike is also fairly effective.
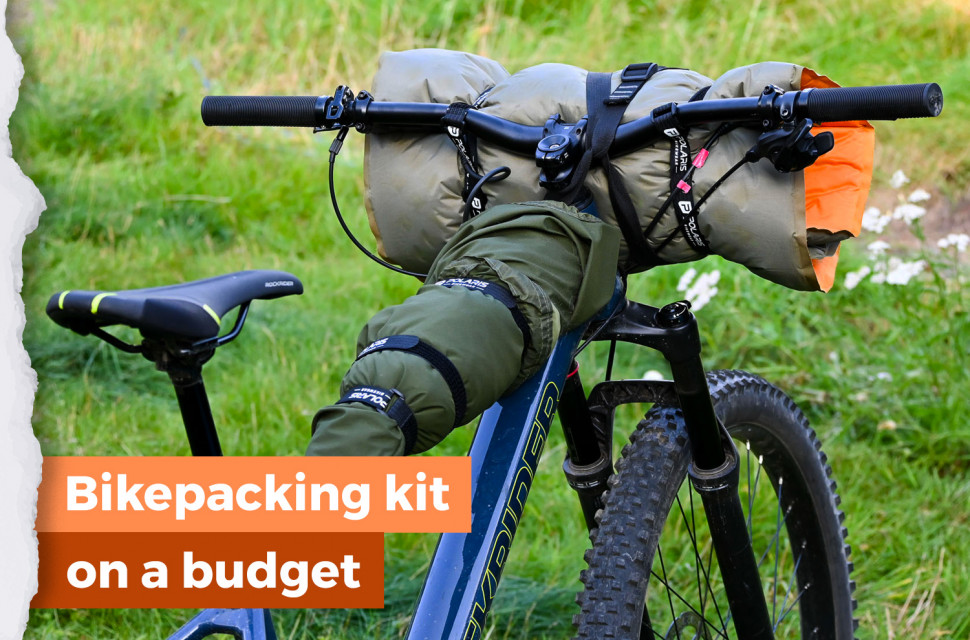
Most sleeping bags have a stuff sack, so put it in that, wrap your bivvy bag and sleeping mat around that and then use some webbing straps to secure it to your handlebars - making sure you don't bend or trap any cables. It might not be as secure as the proper stuff, but it'll work.
It's also possible to wrap items like your bivvy bag or sleeping mat around the top tube if the frame design allows. Polaris does some good, cheap (£7 for a pack) hook and loop straps that are very versatile for securing things in this way.
If you can get most of the bulk onto the bike, then a small pack should be enough to carry spare clothes, tools and food. Even if the weather is great, we always reckon you need to take a good waterproof and some extra insulating layers because it does often get fairly chilly in the dead of night. It's often a good idea to stick kit in dry bags in case there's unexpected rain.
So there you have it: a solid bikepacking setup including a sleeping bag, a bivvy bag and most of the other stuff you need to get out into the wild and sleep in comfort for around £100.
Bikepacking doesn't need to be an epic struggle of human versus landscape - it can just be a cheap and really enjoyable way of making two or more smaller rides into one big one with some wild camping in the middle. You don't need fancy, lightweight gear or specialist stuff to give it a go either - just the absolute minimum of money and gear.
Finally, always remember to leave your campsite exactly as you found it - if you took something with you, take it back out - and it's also worth pointing out wild camping is technically illegal in most of the UK unless you have the landowner's permission. Oh yeah, remember to have as much fun as possible too - now get out there and have some adventures!




1 comments
Also take a look on PlanetX they have some cheap bikepacking gear that doesn't seem to bad.