Bikepacking basics: bike repair and first-aid kit

We never want anything to go wrong when we’re out riding, but unfortunately sometimes the unexpected does happen. Being properly prepared is arguably much more important when you’re out bikepacking, as you may be quite a bit further away from help and in significantly less accessible areas. This article covers the things we carry in our first-aid and repair kits and why we think you should, too.
- Bikepacking for beginners - the complete guide to getting started
- 11 tools every home bike mechanic should own
- Five mountain biking myths that just aren't true
What you take depends on the length of the ride and where you are going. Shorter expeditions, and excursions closer to society require less equipment. It’s also important to note that you’re never going to be equipped for every eventuality and there will sometimes be improvisation involved.
The bike repair kit
The bare bones kit is still larger than you would take on a day ride but should cover you for most eventualities. The most likely issue tends to be punctures, so there’s a focus on that. For longer trips you may want to expand the toolkit slightly.
Bare bones
These are the essentials that should cover 90% of the problems you encounter, and more critically should let you at least hobble back to civilisation if things go wrong.
Basic tools
- Multi tool: Make sure that this has all the sizes that you need for your bike. For more practicality, I prefer to use standard hex bits with a driver – my favourite is the Topeak Ratchet Rocket. The bits you take can be adjusted to what you need and it’s much easier to use than a fiddly multi-tool.
- Leatherman (with pliers): Knives and pliers have all sorts of uses, beyond just repairing your bike. I went for the simplest I could find, and sometimes miss having a corkscrew. Aside from that its perfect.
- Duct tape: Arguably if you can’t fix it with duct tape then it’s not worth repairing. I wrap duct tape around an old film reel for more compact storage but you can also use the handle of your pump.
- Zip ties: Zip ties have a multitude of uses and weigh nothing. Take more than you think you’ll need.
- Super glue: Can be used for all sorts of things including capping off various repairs and making extra strong bonds with duct tape.
Tyre Kit
- Pump: I have a Topeak Morph pump which is great but is starting to show its age. I would love to upgrade to a Lezyne Micro Floor Drive pump. If I’m going for a shorter trip I might take a smaller pump to save weight and pack size.
- Tyre levers: One or two – depends on how many you need to free your tyres usually.
- Tubes: I tend to take two spare tubes regardless of how far I’m going, though I’ll admit I do have a propensity for breaking tyres.
- Tyre plugs: Indispensable for on-the-go tubeless repairs. Tyre plugs/strings can be real lifesavers. It’s possible to stack them for larger holes (I also carry different sizes) and reinforcing the plug with super glue can’t hurt. I would also check out (small sized) automobile plugs as these avoid the inflated prices of “bike specific” kits.
- Patch kit: In addition to your tubes carry a puncture repair kit. I really like the Park Tool “glueless” Super Patch kit. However traditional patches and vulcanising glue can be more versatile (and repurposed for other uses). It may also be worth considering carrying a Radial patch for sidewall repairs if running tyres tubeless.
- Tyre boot: I have split sidewalls before and it’s an absolute pain. Paper money, credit cards and duct tape will do in a pinch, but the Park Tool tyre boots are rather useful. Of course, since I’ve added them to my tool kit I haven’t had any problem anymore.
- Needle and thread: Make sure it’s a curved needle to let you do tyre repairs without having to unseat the tyre. Tooth floss work very well for sewing up gashes in tyres.
- Razor blade: Mainly for cutting down tyre plugs, but can be repurposed for whatever you need it for.
I carry everything in an old puncture repair kit case that I had. It fits the items rather neatly.
Optional Extras
The longer and more remote your trips become, the more you might want to consider taking with you. The list below is roughly in the order that I am likely to start carrying items, from most frequent to least frequent.
- Lube: I usually carry a little tube of lube with me. It doesn’t weigh much and your bike will appreciate it.
- Brake Pads: Depending on the length of the tour, or the conditions (read: gritty and wet) it’s probably worth taking extra pads. It’s not like they weigh that much.
- Rag: A little rag is nice to have if you need to clean things off your bike or clean yourself afterwards. Not essential, but can make life a bit more pleasant.
- Ski straps: I think ski straps are one of the most useful and versatile item you can carry with you. Use them to lash things to your bike, make emergency repairs and be assured that these straps are basically indestructible. Voile straps are basically the de-facto standard.
- CO2 Pump: It may be worth carrying one to reseat a tubeless tyre. However, bear in mind that CO2 chargers can cause the sealant to harden (though there are CO2 compatible sealants on the market). It seems this is mainly due to thermal shock, so if you do use a charger, have the valve at the top allowing the sealant to run to the bottom and avoiding it freezing. Personally, I would re-inflate with a pump and ”normal” air, though this may be overkill.
- Spokes and nipples: A packable alternative is a FiberFix spoke which is made of Kevlar cord. This also means you won’t need a cassette tool to repair spokes on the drive side of the rear wheel. I’m currently experimenting with a DIY version.
- Spoke wrench: For the above.
- Chain tool: If you snap a chain in the middle of nowhere you will not be in a happy place. Take a chain tool, either as part of your multi-tool or separately.
- Power links (plus chain length): To be used with the items above. Whilst just power links can be used on their own you may have to shorten the chain. A few extra links can’t hurt.
- Spare bolts: Take one or two essential bolts such as for racks or chainrings.
- Spare cleat: I’ve never lost a cleat but having a spare (plus bolts) can’t hurt. Alternatively, check that yours stay tight regularly.
- Derailleur hanger: A part that sometimes breaks and isn’t always easy to find as it’s usually bike specific.
- Shock pump: May come in handy for keeping suspension set up properly during longer trips - or just set up things properly before you set off.
- Sealant: Make sure to top up the sealant in your tyres (if you’re going tubeless) before you leave. I would usually put a little extra in too. If you’re on a longer trip I would consider taking spare sealant for repairs or topping up on the way.
- Spare valve: For tubeless setups, valves can break and clog. A spare valve isn’t going to weigh you down.
- Cables: If you’re unlikely to have access to a bike shop having spare cables may be handy.
- Special tools: There are some tools that are bike specific. The most obvious that come to mind are a cassette tool and bottom bracket tool. On extended trips abroad where you may not have access to well-stocked bike shops taking these is worth considering.
The first-aid kit
I do a lot of mountaineering and my first-aid kit is fairly minimal. The key is versatility and being able to improvise. What I take with me doesn’t really change all that much, though the amounts of individual items vary depending on the length of the trip.
I’ve been told before that if you can’t remedy an injury with duct tape then you’re in a bad place. A little extreme perhaps, but outdoor first aid is about being able to treat minor injuries, or preventing major trauma from killing you before you get proper help.
Please note that having a first aid kit is not a replacement for doing a comprehensive first aid course. Having the right equipment is absolutely no use if you don’t know how to use it properly. Do an outdoor first-aid course and make sure you have the necessary training. Most of the time nothing will go wrong, but for that one time it does it pays to be prepared. I highly recommend that you do a first-aid course.
It is possible to buy pre-made first aid kits but they generally contain lots of unnecessary items and are over-priced. I prefer to make up my own kit which means I also have spares if I need to replenish any items
Basic kit
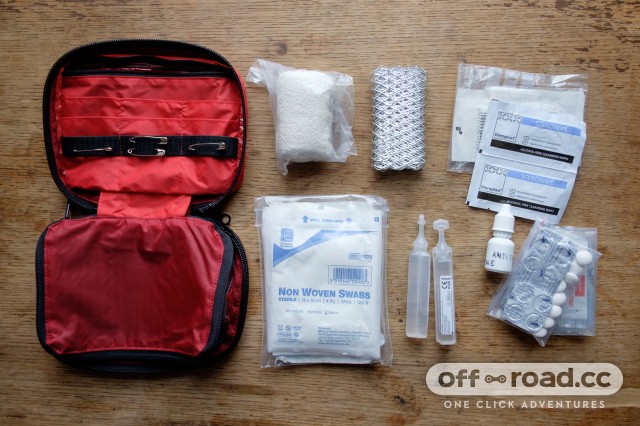
My basic kit weighs 175 grams and could be lightened even further. This covers most common complaints and will also help in the event of major injuries. I try to put everything in zip-lock bags to keep things dry. This also helps separate items so that I can find them more easily. Keep everything in a simple bag - I'm currently using an Outdoor Research Backcountry Organizer which also fits most of my tools.
- Bandage: There are several different bandage types. I generally just carry a crepe bandage which can be used both to hold dressings in place as well as providing limb support. Conforming bandages are used for holding dressings in place but remain flexible. They can also be used to clean wounds. Cohesive bandages are self-adherent and provide support and compression – they are also a versatile option.
- Non-adherent dressing: I take one or two large Melolin dressings which can be cut to size if required.
- Sterile swabs: Used for cleaning wounds (with iodine solution) or for additional padding around wounds.
- Transpore tape: I find this tape sticks by far the best of all I have tried.
- Assorted plasters: Take a range of sizes for small cuts and scrapes. I prefer fabric plasters which generally stick better. Hydrocolloid (blister plasters) work great for burns and blisters.
- Steri-strips: Lightweight and super-handy for closing lacerations.
- Antiseptic: I keep some iodine solution in a small dropper bottle.
- Antiseptic wipes: Arguably redundant if you have iodine solution and swabs. Can be handy for smaller scrapes.
- Saline pods: Some people will prefer to take a small syringe to irrigate wounds but I find one or two saline pods work very well. Useful for eyes too. You could leave these behind and use drinking water to flush out wounds.
- Analgesics: I take Ibuprofen and Paracetamol as pain-killers. Ibuprofen also helps with inflammation whilst Paracetamol can help with fever. Sometimes I may also consider carrying some Aspirin.
- Anti-histamines: These are used in the case of minor allergic reactions. I carry more in the summer as I suffer from hay-fever.
- Loperamide: Helps treat the symptoms of diarrhoea but not the cause. Can help to get you out of more remote locations but not recommended for use over extended periods.
- Rehydration salts: I use rehydration salts quite regularly when out riding. I find my muscles recover a lot better with them.
Extended kit
Most of this is what I would carry if travelling further afield where access to reliable medical supplies or help is less certain. If on an expedition, I will also carry more of the items listed in the basic kit. Again they are roughly in the order I am likely to take them.
- Athletic tape: I often use athletic tape pre-emptively to avoid blisters. It sticks really well to skin and usually lasts a few days. It can get a bit rank in the wet though.
- SAM/Primacare splint: These splints consist of aluminium surrounded by foam, which when bent into shape become rigid. They are lightweight and versatile pieces of kit. I've recently come across Primacare splints, which are just the wire mesh and as such significantly lighter and more packable.
- Tweezers: Useful for all sorts of things including removing ticks, splinters and debris from wounds.
- Scissors: Paramedic shears make cutting dressings to shape and gaining access to injuries underneath clothing a lot easier.
- Trauma dressing: Israeli Bandage dressings are possibly the best dressing for severe bleeding and major trauma.
- Gloves: Use these to protect yourself from bodily fluids (i.e. blood). Use powder-free nitrile gloves as latex allergies are increasingly common.
- Thermometer: Can be helpful for diagnosing various conditions including heat exhaustion.
- Antibiotics: If you’re travelling somewhere you expect not to have access to medical support you may want to discuss what you should take with your GP.
- Suture kit: Don’t take this unless you know what you are doing/have been trained.
You will know whether you require any specific items such as an EpiPen. Discuss with your GP any vaccinations or medication (e.g. malaria prevention) you may require for travelling abroad.
I keep everything in a simple pouch and make sure I know what I've stored where. The size of the pouch varies depending on what I'm taking, the trip length and what storage options I have for it on my bike. The key is versatility and adapting the kit to your anticipated needs.
Butt kit
On extended tours keeping things clean down there can be a challenge. Use chamois crème when you’re riding and baby wipes or sanitizer for cleaning yourself up. Try and swap out shorts regularly and wash them when you can. Consider carrying some ointments if you do start to develop irritation or saddle sores.
Please note: my recommended kit may not cover all eventualities. I’ve put it together based on my own experience and research but I am not a medical professional. Your needs may vary so use common sense. Most important of all, make sure you do an emergency first aid course!



2 comments
If the rules in the UK forbid a knife of any useful size take a small camping hatchet instead, it will do all that a knife will do and more. I bought a real cheap one that had a hammer on the opposite side of the axe blade, so now I don't need a tent stake hammer, and some goofy simple tools. This axe I bought was only $10, but due to it's cheap price I noticed the head was fastened to the handle by just 3 rivets, fine I'm not chopping down trees with it but it concerned me, so I took some JB Weld steel glue (the kind you have to mix two elements together) and I put a fairly thick coating on the outside and on the inside to give it some additional support. I have used it with no problems yet, but it does work great for thinly slicing some wood for kindling, it will chop limbs too big to break with your hands, it pounds my tent stakes in, so it's been quite handy. Obvously you can buy better axes than the one I got, but I'm doing eveything as cheaply as I can and if works great, if not I'll buy a better axe, but so far it's holding up great. No matter what axe/hatchet you get you need to sharpen it before every outing.
You would be surprise though at how much inexpensive small camping stuff stuff you can get at Walmart that is exactly the same as the more expensive brands for a lot less money, and they work great and last a long time. They even have stoves on Amazon now that only cost $13 or so, I got one of those and it works just as good as my friends $75 dollar one! There are YouTube videos that show you stuff you can buy for cheap that works just great touring or backpacking.
Knives with pliers are very useful but we beware the rules in the UK.
If you have a blade larger than 3" and/or it has a safety lock then then unless you have a good reason for having it on you that could be a mandatory prison sentence.
Now if you're camping you can probably justify having a lock knife on on you... unless you pop to the shops and still have in a jersey pocket then you could get into trouble if you're stopped.
It's much, much easier to go with something with a sub-3" friction folding blade like a Victorinox Swisschamp. Still has pliers and blades but you can take it almost anywhere without the need for a prior justification.
Just a thought.