Is it worth converting your mountain bike to tubeless?
All your tubeless questions answered.

More Features

Top tips for keeping on top go your tubeless tyre sealant.

Everything you need to know about mountain bike trails and where to find them.

South African XCO World Champion Alan Hatherly is taking the step from mountain bike World Cup racing to WorldTour road racing – is the way ahead for the sport?

As another year of gloom draws to a close for the British bike Industry, we catch up with Si Paton of the Malverns Classic and Dom Mason of Mason Cycles to hear their stories and takes on the “state of the nation” in terms of the bike industry.
Converting your tyres to tubeless is the first upgrade anyone should make to their new bike. Not only does it drop the rotational mass of your wheels but it improves puncture resistance as well as introduces a host of benefits to your ride. The conversion isn't straightforward though, and it's not without some kind of compromise, so let's dispel some myths over the humble tubeless conversion.
- Best tubeless sealant 2024 - tyre sealant for MTB, gravel and road
- Tubeless mountain bike tyres - everything you need to know
- How to: Convert your bike's tyres to tubeless - Top tips on ditching the tubes
What are the benefits of going tubeless?
The benefits of converting your tyres to tubeless are huge, so much so that every bike we ride ends up with tubeless tyres. The first and most noticeable is that you'll be shedding weight from your wheels and that reduction in rotational mass makes a serious improvement to your handling.

Weldtite_Tubeless_Sealant_2.jpg, by Matthew Page
Then, because there's no inner tube to get caught between your tyre and wheel rim, pinch flats that are all too common with tubed setups are reduced drastically. Then, to further improve protection and potentially ride quality, tubeless tyres allow for the installation of tyre inserts.
Furthermore, puncture protection in general sees an improvement but that's not to say that you won't get punctures. Inside a tubeless tyre, there should be a sealant and in the event of a puncture, this sealant will find the puncture and coagulate as it reacts with the air. Sometimes this process is so fast that you'll never know it's happened. Sealant is also effective in the rare event that you get multiple punctures at once.
However, that added protection allows for lower tyre pressures without worry of ending your ride via puncture. Lower tyre pressure lets the tyre conform over terrain more freely, thus it'll provide more grip. Rolling resistance is lowered too for this very reason.
What are the downsides to going tubeless?
Although the benefits of tubeless tyres are many, it's not a perfect system. The setup of a tubeless tyre involves more. If your rim isn't already sealed with the use of tubeless rim tape, or the rim isn't UST, you'll need to tape your rim to achieve a proper seal as well as a tubeless-specific valve. There's then adding sealant and seating the tyre's beads. The latter can be quite a task, depending on the chosen rim and tyre combination, so much so that it might require more specialist high volume or charger pumps to successfully install a tubeless tyre.

Finish_Line_Fiberlink_Tubeless_Sealant_Fibers.jpg, by Matt Page
Tubeless tyres also require regular maintenance. Eventually, tubeless sealants dry out and at that point, while you can get away without, dry sealant will need removing to achieve the best surface for sealant to flow over as a wheel rotates. With that, sealant will need topping up every once in a while.
Rim tape can also be damaged if you're one to regularly swap tyres with tyre levers. A hole in rim tape destroys the seal that's required for a wheel and tyre to hold air, thus damaged rim tape will need replacing.
Speaking of seals, tubeless setups can be sensitive to rim damage. A crack in a carbon rim or a particularly bad ding in an alloy rim could stop a tyre from seating properly, or spell the end of the seal that a tubeless system relies on.
Is tubeless lighter than tubed?
Typically, yes. Having weighed a 29x2.4in butyl innertube from Kenda, which came in at 251g, a single standard-type tubeless-specific valve, a 29-inch wheel's worth of rim tape and 140mm of Stan's Race Day sealant, the tubeless setup weighs 144g.
Of course that can change depending on how much sealant you choose to use, but Muc-Off's recommendation is 140g for downhill use.

Pirelli Scorpion Smartube front, by Aaron Borrill
A tubed setup can become lighter if you opt for TPU tubes from brands such as Tubolito, Pirelli and WTB. A 29-inch Pirelli SmarTUBE weighs 97g (on my scale) and although more resilient than a butyl tube, running one of these still runs an increased risk of pinch flatting and punctures.
How much does it cost to go tubeless?
If you're happy to perform the conversion yourself, expect to spend around £50 on a tubeless conversion kit. That should kit you out with all of the things you need including valves, sealant and rim tape.
However, many new bikes come with their rims pre-taped and with tubeless compatible valves in the box. Some even come with sealant. It's a similar case with wheels too - many are pre-taped and come with valves which will certainly save you some cash.
What different types of tubeless systems are there?
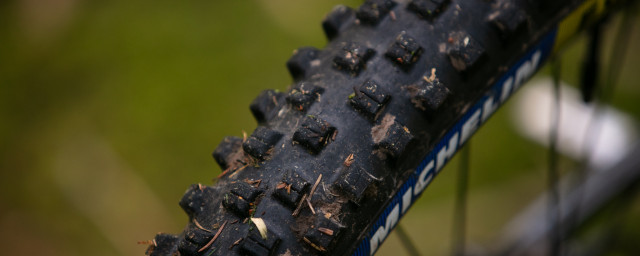
There are two main systems, UST and Tubeless Ready. The former relates to both rims and tyres and is a technology pioneered by Mavic, Michelin and Hutchinson in 1999. UST is a system that uses a groove in a wheel's rim that encourages a tyre's beads to rise and clip into the rim's hooks while being inflated. UST rims don't require taping as the rim itself is sealed and spokes are accessed externally. UST tyres then feature an extra layer of rubber that provides an airtight seal, so technically, UST setups don't require sealant to become airtight but generally, UST tyres are heavier.
Tubeless-ready setups are much more common with 'tubeless-ready' referring to products that can work with tubeless tyres. Tyre brands often use their own names to refer to tubeless-ready components such as Specialized's 2Bliss and Schwalbe's Tubeless Easy but generally, they all mean that they're tubeless-ready.
Tubeless-ready tyres and rims need rim tape and sealant to create a seal.
How big a hole can tubeless sealant seal?
Tubeless sealants can seal punctures up to around 6.5mm but there are many variables to consider. Effective sealing often depends on where the puncture is on the tyre as punctures close to the bead can be tough to seal as they're in a spot that's hard for tubeless sealant to reach. Plus, the larger the puncture, the less likely it'll seal owing to the size of the hole that's been created. Sometimes, a puncture just won't seal.
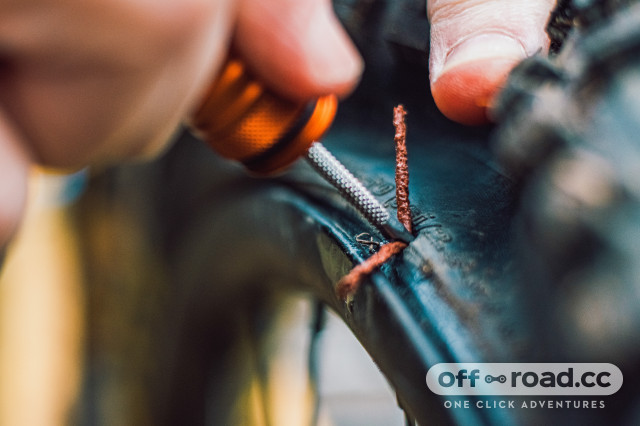
2022 peatys holeshot puncture plug insert.jpg, by Liam Mercer
When punctures get too big, or they're simply just not sealing, that's when a tubeless repair kit comes in handy. Inserting a plug into a puncture creates its own seal that's then bolstered by tubeless sealant.
How often should I change or replace the sealant?
This depends on the manufacturer and type of sealant you've chosen. Stan's No Tubes, for example, says that its sealant will stay a liquid for up to seven months. However, that can be as little as two. That depends on your environment and climate. If you're living and riding in a warmer area, sealant will dry quicker than if you live in the wet and cold.
Stan's Race Day sealant uses a different formula and is designed to provide improved puncture sealing performance by using a higher percentage of sealing crystals. But this particular sealant can dry in as little as two weeks.
A good rule of thumb to follow is to check in your sealant every three months, unless stated otherwise by the manufacturer, just to make sure that it's still a liquid that freely flows inside of your tyre.
You might also like:
Author block