Tubeless mountain bike tyres - everything you need to know
The pros and cons of tubeless mountain bike tyres and how to find the right setup for you

Punctures don’t care if you are a well-intentioned newbie or a cautiously experienced mountain biker. They happen to all riders and remain one of the most annoying things in mountain biking. But they used to happen a lot more often, before tubeless mountain bike tyres.
- Best mountain bike tyres 2022 - quality rubber for trail, XC and enduro
- The best trail and enduro mountain bike wheelsets, tried and tested
- Kit to take on a mountain bike ride from the bare minimum to safety essentials
One of mountain biking’s most significant product developments since the mid-2000s is tubeless tyres. The description is self-explanatory but there’s a lot more to tubeless tyres and their benefits than simply not having the hassle of inner tubes.
Where did tubeless mountain bike tyres come from?

2022 Orbea Oquo wheels MP30 LTD.jpg, by Oquo wheels
To understand why most new mountain bikes are sold with tubeless tyres, it’s worth asking why they weren’t in the first place. As with many product development issues in mountain biking, it’s a road cycling legacy thing. Because of its scale, influence and stature, road cycling directed much of mountain biking’s product development spectrum from the 1980s to the early 2000s. But inner tubes were never a good idea - especially off-road.
With thorns, rocks, roots and square-edge terrain textures, a technical singletrack trail has too many potential puncture zones. And that’s why mountain bikers struggled for decades, with the fragility of inner-tubed tyres. Some product designers and riders wisely looked to the off-road motorcycle industry for guidance. And so the tubeless mountain bike tyre began its journey from fringe idea to industry standard.
Mountain bike rim designers realised that a specifically shaped profile or rim bead would be required to help keep tubeless tyres in place once seated. French wheel specialist, Mavic, was the prime mover.
Mavic engineers applied for a US patent in 1998, eventually publishing their design in 2001. This patent application detailed a rim with grooved channels to help keep the tyre in place and became the bases for UST (Universal System Tubeless). Mavic’s idea was broadly reinterpreted and evolved by other rim brands, under the guise of TS (Tubeless Ready) rims.
Reshaping rims profiles to hold tubeless tyres in place is one element of the equation. The other element was a more fluid idea. Literally. Around the time that Mavic published its US tubeless rim patent in 2001, an American mountain biker named Stan Koziatek, was on his own quest to solve the inner tube issue.
Koziatek formulated a sealant to replace inner tubes. His innovation proved so successful it became the industry standard for tubeless tyre sealant. Today, most bike mechanics have a bottle of Stan’s NoTubes sealant on the shelf. For Stan Koziatek, tubeless tyres and sealant work as a system, not as independent elements. His experience and deep knowledge of tubeless tyre sealant and rim interfacing expanded Stan’s NoTubes business beyond fluid products, into a range of industry-leading rims, explicitly designed to work with Stan’s No Tubes Race sealant and mount most tubeless tyres with ease.
Why are tubeless tyres better than inner tubes?

2022 liam staff bike valve.jpg, by Liam Mercer
In conventional tubed tyre design, the inflated inner tube helps to hold your tyre in place. Especially when inflated to low pressures, an inner tube is very susceptible to pinch flatting when squeezed between a rock, root and the rim as you roll over off-road terrain with your mountain bike. With tubeless tyres, you can really run your mountain bike tyre pressure as low as you wish without the fear of pinch flats.
The tubeless technology works by distributing the task of keeping your tyre mounted between the rim’s bead shape and fluid tyre sealant.
The absence of an inner tube and the presence of tyre sealant result in a more robust tyre structure. Even if you get a thorn puncture or pinch flat impact, rolling over rocks and roots at speed, the tubeless tyre’s sealant uses centrifugal force to find that hole and plug it, most of the time before you even notice it happened.
Are tubeless tyres more of a hassle?

Hunt Enduro Wide V2 Wheels Review 2022 front rim.JPG, by Jim Clarkson
In principle, tubeless tyres are much less riding hassle because you are less likely to puncture. And if you do, you might get away without even stopping as the sealant does the puncture repair for you.
A mountain bike rolling tubeless is also far more enjoyable to ride than tubed tyres. You can enjoy your bike’s suspension technology and frame geometry, engaging with trail features such as rock gardens, jumps, drops and rooty sections without the trepidation and anxiety of an imminent flat.
Tubeless tyres can be a slight hassle to set up compared to inner tubes. Especially if you aren’t particularly dexterous or have a phobia about industrial chemicals. The sealant that helps a tubeless tyre remain seated to your wheelset’s rims can be messy to work with.
Some brands don't mix well within the diversity of tubeless rims and tyres. It is not unheard of for mechanics to struggle to mount certain tyres with some of the older tubeless rim designs for half an hour.
Hookless rims are the primary candidate for annoyance. If a rim bead is particularly unhelpful, one remedy is to apply some dishwashing liquid or soap to it for enhanced lubricity. If you do that, be careful not to spill some soapy solution on your brake rotors while trying to seat that stubborn tubeless tyre.
Tubeless tyres also require Presta valves, and you get what you pay for. Don’t think you can go cheap with the valves. The presence of sealant can clog a cheap valve design, making it a nightmare to inflate, deflate or pressure control.
What happens when my tubeless tyres go flat?
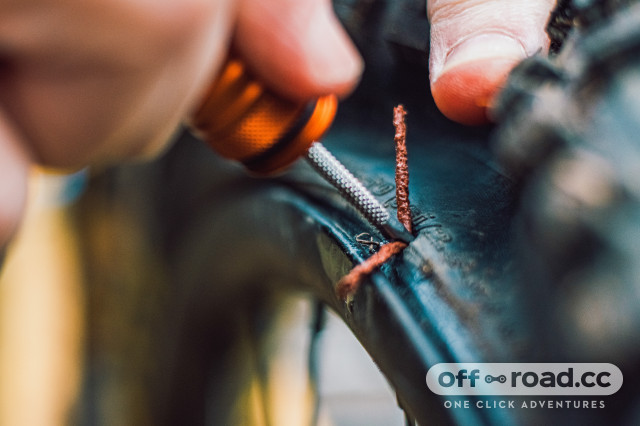
2022 peatys holeshot puncture plug insert.jpg, by Liam Mercer
Although tubeless tyres are more robust and puncture resistant, compared to inner tubes, they aren’t puncture-proof. Or infallible. Tubeless tyres can flat.
To get you rolling again, the procedure for reinflating a tubeless tyre flat is all about response speed. With inner tubes, once you flat, there’s no rush. You know a new inner tube needs to be mounted and inflated. With tubeless, it’s about responding rapidly, ensuring you don’t lose precious sealant.
A variety of reamers and plugs are available for trailside tubeless tyre repair. The best tubeless repair kits have the reamer pre-loaded with a plug. Once you sense that the tubeless tyre is losing air pressure, slow down, dismount, grab the plugging tool, and plunge it into the puncture zone. The plug should seal and keep sealant from spilling and your tubeless tyre unseating.
Once the plug is secure, and you aren’t losing sealant, get the CO2 canister ready. Attach it to your rim valve, and inflate. After inflation, check to see that your plug is airtight.
A word about CO2 emergency inflation and tyre sealant: they mostly don’t get along. The fluid properties of most sealants alter when exposed to freezing gas from a CO2 emergency inflation.
Unless you run an appropriately formulated tyre sealant, which can resist the chemistry influence of CO2 reinflation, it is best to top-up your tyre sealant after getting home, if you've used a puncture plugging kit and CO2 canister to get rolling again.
How to choose tubeless mountain bike tyres

maxxis minion ss dd shoulder.jpg, by Liam Mercer
Industry scale and product planning have done much of the choosing for you: virtually all new mountain bikes, except for the cheapest versions, come with tubeless tyres. But if you are converting your existing set-up tubeless it isn't as easy as deciding to take the tubes out and fill the tyres with sealant - you do need tubeless specific or tubeless-ready tyres for the technology to work.
But when you need to choose a new tubeless tyre, or convert from inner tubes, what are the notable decision points?
Tubeless tyres of the same tread come in a range of different options, allowing the rider to pick which rubber compound (hard, soft, or a combination of the two) and the casing, or level of protection on offer. These will vary in price and weight.
Starting with rubber compounds, the softer they are, the more grip the tyre will provide but that’s at the expense of rolling resistance, or how tough that tyre will be to pedal. It’ll also wear out faster. A harder rubber compound will offer less grip but it’ll be more durable and it’ll roll faster, or be easier to pedal.
Tyre casings are all about strength, support and weight. The lighter the casing, the less puncture protection it’ll offer and the more likely it will be to move around on the wheel’s rim, or squirm. Go for a heavier casing, and you’ll benefit from more puncture resistance and a more supportive tyre, which will be much more stable when cornering.
There’s also the subject of tread patterns. Smaller knobs are favoured by cross-country mountain bikers as they offer the lowest rolling resistance while balancing a usable level of grip. Up the ante a little, and there are tyres such as the famed Maxxis Minion DHF which is a solid tyre for all-round trail riding. Its knobs are larger but because they’re cleverly placed, it rolls well but not as efficiently as cross-country tyres. The more aggressive tread pattern will also offer better braking performance.
Up the aggression again and there are tyres such as the Continental Xynotal which has widely spaced but rather pointy knobs. These offer better performance when the trail surface is loose, dusty or wet. There are then mud-specific tyres that are more aggressive still.
A good rule of thumb to follow is that the more aggressive the tread pattern, the more grip it’ll offer in soft conditions but at the expense of increased rolling resistance. Then a smaller tread pattern will roll faster but it won’t offer as much grip.
You might also like:
Author block