
First look - Park Tool DT-5.2 Disc Facing Tool
A closer look at the tool you never thought you needed

Building a bike is one of the most rewarding experiences but it doesn’t come without headaches - especially when you’re troubleshooting and things aren’t going as smoothly as they should.
- Best multitools for cycling
- 7 trailside fixes every cyclist should know
- 11 tools every home bike mechanic should own
I recently faced such a problem building up a Cannondale Lab71 SuperSix Evo 4 frameset. After plumbing the brake hoses through the frame and tricky one-piece MomoDesign SystemBar R-One, setting up the Shimano Dura-Ace R9200 Di2 to perfection, bleeding the brakes and torquing all the bolts, I ran into a problem that caused me much anxiety and frustration. The flat-mount rear caliper just wouldn’t align properly and the issue escalated the more I tightened the caliper bolts. I gave up after nearly eight hours of anguish and took to the internet to find a solution.
It wasn’t long before I encountered similar situations and learned that the issue I was experiencing wasn’t uncommon. In fact, it’s more prevalent in framesets than fully built bikes for obvious reasons. See, once a frame is prepped and then sent for paint there’s often overspray which gets onto the brake mount area. In most cases, this will be sorted out or ‘faced’ before it leaves the factory but sometimes this needs to be done by the bike shop or brand carrying out the build.

Park Tool DT-5.2 Disc Brake Mount Facing Tool - detail 2, by Aaron Borrill
To provide some context, an improperly faced mounting surface will cause alignment issues and brake noise and, no matter how hard you try to align the caliper, when it's time to torque the bolts, the caliper will move out of position. This is where the Park Tool DT-5.2 Disc Brake Mount Facing Tool comes into play. The DT-5.2 faces any international standard (IS) mount, post mount or flat mount brake configurations, including low-clearance chainstay mounts.
Let’s take a closer look at the tool, what comes in the kit and how it works.
Park Tool DT-5.2 Disc Brake Mount Facing Tool - what’s in the box

Park Tool DT-5.2 Disc Brake Mount Facing Tool - Detail 1, by Aaron Borrill
The DT-5.2 is a pretty comprehensive bit of kit and can solve a variety of facing needs. The tools come beautifully packaged in a Park Tool hard case and are neatly pressed into a foam base to keep things secure and aesthetically pleasing.
In terms of the tooling and hardware, there are telescopic axle adaptors that will play nicely with any configuration of open or thru-axle dropouts and dropout widths, including Boost 110, 148 and fat bike axles. Two facing cutters are included to ensure compatibility across the board with IS mounts, post and flat mounts.
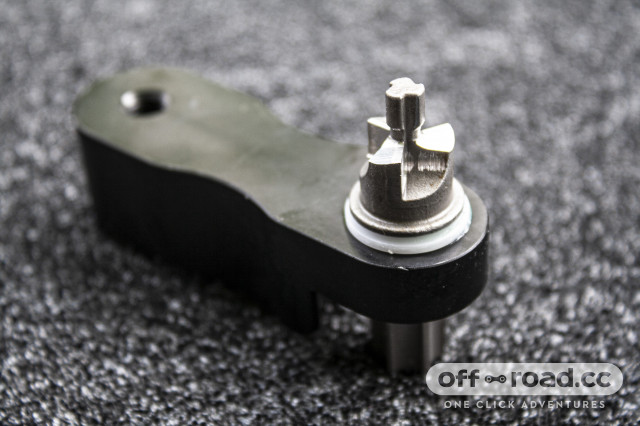
Park Tool DT-5.2 Disc Brake Mount Facing Tool - Detail 3, by Aaron Borrill
The kit comes standard with the ‘2171’ facing cutter that is designed for facing aluminium, steel and titanium disc brake mounts. For carbon-fibre frames or frames that utilise aluminium inserts (with a carbon/aluminium hybrid mounting surface), you’ll need to purchase the ‘2197’ facing cutter separately. The 2197 uses a brazed-on diamond grit interface that is over 100 times more robust and better suited to carbon fibre than the 2171.
Park Tool DT-5.2 Disc Brake Mount Facing Tool - how it works

Park Tool DT-5.2 Disc Brake Mount Facing Tool - Detail 4, by Aaron Borrill
The DT-5.2 was designed to machine frame and fork disc brake mounts so they are precisely level for brake caliper and rotor alignment. For the particular job carried out on my Cannondale Lab71 SuperSix Evo 4, we needed to identify the axle type before assembling the tool and starting the procedure - and by ‘we’ I mean Glen Whittington the mechanic from Spoon Customs in the Surrey Hills.
Owing to the fact that my Cannondale has disc brake flat mounts at the rear, we fitted the 12mm male axle into the frame - you can slide and rotate the telescopic axle for the best fit by loosening the pivot bolt, and then use your original axle to lock everything in place (it slides through the hollow telescopic axle).
Park Tool DT-5.2 Disc Brake Mount Facing Tool - Detail 6, by Aaron Borrill
Next, you’ll need to place the two threaded alignment studs into the bolt holes of the mounts and adjust the arm assembly section so that the cutter body sits flush and parallel against them - also remember to tighten the body onto the axle. Once that’s all sorted you can pull out the studs and begin the facing process.
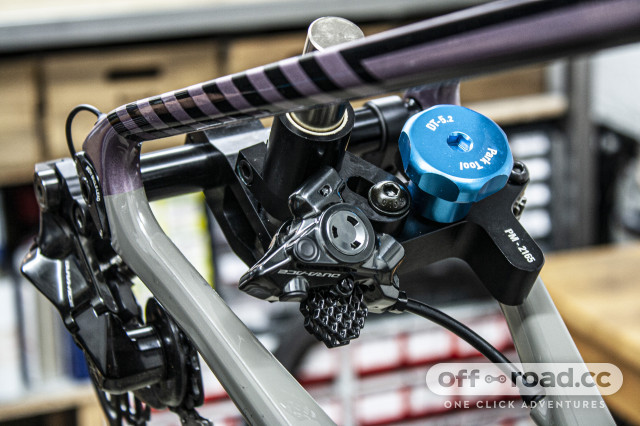
Install the blue knob and apply some cutting fluid as this prolongs the tool’s life. With light hand pressure, you can start turning the knob and begin to cut until you see a consistent ring around the mounting area. On carbon bikes, you can use a permanent marker to colour the facing area as this will serve as a reference point and show how much you’ve cut away.

Park Tool DT-5.2 Disc Brake Mount Facing Tool - Detail 7, by Aaron Borrill
After facing the first mount area, you’ll need to establish your stop-collar height which gives the baseline level for the cut and ensures the tool and facing procedure stays on the same plane. When you move the tool across to the second bolt hole, you should be able to see a small gap between the slider and the stop collar which shows how much material you’ll need to cut away. Repeat the first cutting step and you’re all done.

Park Tool DT-5.2 Disc Brake Mount Facing Tool - Detail 9, by Aaron Borrill
If that sounds a little too complicated it’s worth watching this How to use the DT-5.2 Disc Brake Mount Facing Set video by Park Tool which breaks down the process in easy-to-follow steps.
Park Tool DT-5.2 Disc Brake Mount Facing Tool - do you need it?

Park Tool DT-5.2 Disc Brake Mount Facing Tool , by Aaron Borrill
The truth is you probably don’t but after speaking to several bike shops, most mechanics encounter facing jobs quite regularly so it’s more common than you think. It’s also an intricate procedure and you’ll need to know exactly what you’re doing to ensure nothing gets damaged or unevenly faced - especially on carbon-fibre frames.
At £500 it’s a steep purchase and should be considered an investment - especially if you’re an ardent or aspiring home mechanic. Looking at the tool itself, what it offers and the adjustability and compatibility with all contemporary frames and axle standards, it’s a handy tool to add to your collection if you’ve got the cash to burn or have a passion for bicycle tool collecting.
Do you need it? You probably don’t but there’s a good chance you’ll run into a facing issue if you personally build your own bikes.
You might also like:
Author block


