Bicycle chain wear - why it matters and how to prevent it

We’ve been using chains to link and drive mechanical devices for centuries. Chains need to be strong and durable – and that's why they are manufactured from steel and not aluminium. As a chain is used, it starts to stretch and wear, and, eventually, this will adversely impact your drivetrain efficiency and shift quality. A worn chain will also prematurely wear down your chainrings and cassette sprockets.
- Welcome to Home Mechanics' Week - a DIY extravaganza
- How to fix a chain on a bicycle
- How to clean your bicycle chain
Diligent maintenance will prolong the life of any bicycle chain. Especially if you are a committed year-round off-road rider, unafraid of muddy singletrack. Adhere to a disciplined cleaning and lubing route regarding your bicycle chain, and it should last for the recommended component life.
Nobody wants to suffer a snapped chain. Not only is it a disappointing way to end your ride, but it can also trigger a huge crash. Even if you manage to retain control over your steering and avoid a terrain impact crash after snapping a chain, the injury risk from over-torquing your knees is real.
Understanding chain wear
How do chains wear, and when do we know when to replace them?
Chain wear manifests as ‘stretching’. This is when the chain link touchpoints between its pins and bushings wear away. Due to chain wear, less material means the chain ‘stretches’ length. And that’s horrible for your drivetrain’s responsiveness because it will start to skip on shifter inputs.
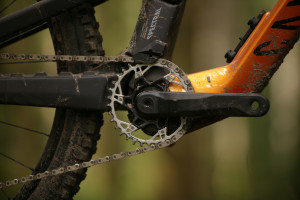
In principle, the bicycle chain is an uncomplicated design. Pins connect to the bushings, which ‘link’ the chain, while those larger rollers around the bushings allow for freedom of movement, enabling the chain to shape to your shifting requirements.
On multispeed bikes, the industry standard is for spacing of 0.5in (12.7mm) between the chain pins. Once that measurement increases, with chain wear, you start experiencing shifting issues.
Do narrower chains wear more?
Chain wear can potentially become a greater issue with the advent of 1x11 (one chainring at the front, 11-speed at the back) and 1x12 drivetrains, which are now the industry standard for most gravel and mountain bikes.
The margin for adjustment and component interfacing on a 1x12 (or 1x11) drivetrain is much narrower than on a 1x10. That’s just a simple matter of available space on the cassette, with 12 cogs situated in a narrower shifting bandwidth than 10, leaving much less ‘play’ for chain wear to be absorbed. If you've ever looked at a single-speed bike chain, you will notice it is much wider than one that you find on your geared bike. And the chains get narrower the more gears you have.
It's also worth noting that 1x12 chains are slimmer than legacy 1x10 or 1x11 chains. And a slimmer chain, running at greater angles on the lowest and highest gears of your 12-speed cassette, does work rather hard for its living. And is more susceptible to chain wear, all other factors being equal to a 1x10 system.
Using your eyes and a ruler
Measuring chain wear is paradoxical. Depending on the chosen inspection method, you can do it very quickly or with great difficulty.
The challenging way of measuring your chain is using a ruler. A factory-fresh chain should measure 12 inches across 12 links, with the end-to-end reference points being the pin centres.
Anyone who has tried to align the measuring lines on a ruler with a chain’s pins will attest to its eye-straining frustration. The margin for chain stretch is tiny. It can be only a few millimetres, which means measuring by aligning your eye with a ruler while balancing the tension of a chain in its ‘straightest’ state, is an imperfect method.
There is a much easier method: using a proper chain checker tool. It’s configured to measure the exact length of a new chain and what those tolerances should be.
Dedicated chain-checking tools look somewhat like metal rulers with two protruding teeth on the lower corner at each end. When you use a chain checker, by placing it on top of your chain, those teeth push against the rollers. If it sits above the chain, you don’t have to worry about a replacement. But if that chain checker tool slides into place too easily, and sits with its lower edge flush against the chain, you are riding a chain in desperate need of replacement.
Considering chain wear margins are so minute, the most accurate measurements are done by not measuring once. As your carpentry teacher always said: measure twice, cut once. With chain wear measurements, you should ideally measure on three parts of the chain for a robustly referenced outcome.
There are digital tools for those who desire the ultimate in chain wear measuring accuracy. These use a vernier structure with a digital readout. You place them on the chain and extend the tool, which accurately renders the measurement on its display.
Affordable lifetime tools – which save you money
If you invest in a chain checker tool, chain wear is easy to measure. And they aren’t expensive. Analogue chain checker tools are priced from about £5 to £15. The digital ones go for £80- £90.
Easy to use and very much a forever tool, which will never need replacing or updating, the chain checker can save you a lot of drivetrain maintenance and money.
The chain can be the cheapest of the three most replaceable elements of your drivetrain (chainring, chain and cassette). It is clever bike budgeting to look after your chain and prevent riding a well-worn one. The only drivetrain component in contact with your cassette is the chain. Therefore, a cassette can’t ruin itself. It happens due to the condition of your chain. Negligent maintenance on one destroys both.
Once your chain is beyond 0.5% of the measured length it should be, replace it. Chain hygiene is something you can control. Regularly cleaning, drying and lubing your chain delivers all the benefits we expect from a gravel or mountain bike drivetrain: longevity and crisp shifting.
A dirty chain is awful to ride. It debilitates shifting accuracy and starts to function as a grinding agent for your chainring and cassette. Measuring your chain takes a minute and can save you unnecessary drivetrain replacement parts.
Maintaining your chain
Unfortunately, even with the most diligent of maintenance routines chains wear but carrying out some solid maintenance will make your chain last much longer. The best methods all include degreasing your chain to some degree and relubricating it with the most applicable chain lube to your current riding conditions.
Cleaning, or degreasing your chain can be done in a number of ways, from completely removing the chain and soaking it in a degreaser to using a chain-cleaning tool. Some also use a brush to scrub it clean with a degreaser. Each of these is effective in its own way, with soaking the chain providing the best clean, however, this is a long process as the chain is best soaked overnight. Chains can be cleaned using a brush but this doesn't result in the most thorough clean. Chain cleaner tools offer the best of both worlds. These can slowly apply a degreaser to the chain while brushing down the links.
Once your chain is degreased and dry, it's wise to apply some lubrication. Chain lubricants come in many forms so it's best to consider the conditions of the trails you'll be riding. A wet lube is best for wet weather as it'll cling to the chain more effectively but will also attract dirt which will wear the chain out faster. Dry lubes are the opposite as they won't attract dirt as readily but will keep your chain lubricated for said conditions. Dry lubricants will wash out easily and will lead to accelerated wear.
Applying lubricant is simple. The best, most thorough and cost-effective method of lubricating a chain is to apply a drip of lubricant to each roller. Then, give the bike's crank a good backpedal. Once the chain is lubricated wipe away any excess with a rag and you're done. Wiping away excess is important as it can attract more dirt.
If you're in a rush, you can apply lube while backpedalling the chain. While there's nothing wrong with this method, be aware that when doing so, you're more likely to over-apply lube.
