Mountain bike frame protection - Everything you need to know

Mountain bike frame protection kits such as Invisframe or Ride Wrap are an entirely optional extra and while they come at a cost, they do a fantastic job of protecting your mountain or gravel bike against everything the trail has to throw at it. In this piece, we’ll show you how to install a mountain bike frame protection kit and look in detail at the benefits it offers.
Do I need mountain bike frame protection?
As previously mentioned, frame protection kits are entirely optional. You might not mind your bike picking up a few battle scars that serve as awesome reminders of the adventures you’ve ridden.
But it goes without saying that a frame protection kit will protect your bike’s paintwork against paint chips from flung rocks, and any scratches or damage that can be caused when the bike’s placed on an uplift. This itself is a big appeal, whether you ride an alloy or carbon-framed bike.
A more long-term benefit of frame protection is that it’ll improve you bike’s resale value. Few people want to buy a second-hand bike that looks like it’s been through the wringer and, if they do, they won’t offer you much to be honest. Applying mountain bike frame protection keeps your bike looking as fresh as possible - and can up your potential asking price as a result.
However, it must be noted that even the best frame protection kits aren’t capable of staving off all kinds of damage. We ride off-road and keep our bikes in sheds or garages so even with the most comprehensive frame protection kit, expect to pick up some stone chips or scratches somewhere.
What kind of mountain bike frame protection should I buy?
Frame protection comes in many shapes and sizes (literally). You can buy pre-cut bike-specific kits that’ll provide the best fit and the most protection from brands such as Invisiframe or Ride Wrap. You could also buy more generically shaped tapes from brands like Dyedbro, which come with cool graphics if you’re looking for more of a custom aesthetic.
While generic-shaped kits are cheaper, they may require alterations to fit your frame perfectly and will need some trimming to get just right.
Bringing things back to basics, there’s also Heli Tape. Heli Tape is a super-durable adhesive tape made by 3M to protect a helicopter’s rotor blades. Though it was quickly picked up by mountain bikers to do the very same to their bike’s frames.
Heli Tape is a generic trademark with many-but-very-similar alternatives being available online for little money. It must be noted that these aren’t perfect as they can discolour over time and they may lack the protective properties of bike-specific kits.
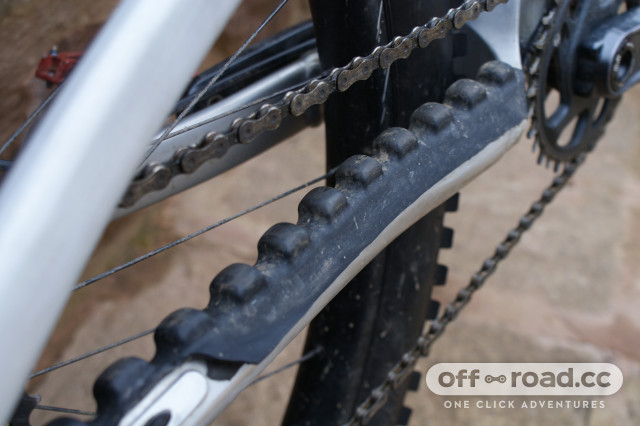
You could even go mega minimal and wrap your chainstays and seat stays with an old inner tube with clever use of tape or zip ties that'll keep your heels from rubbing away paint, and your chain from chipping it away whilst riding. While certainly friendly on the wallet, it's not the most aesthetically pleasing method of frame protection. However, brands are creating purpose built chainstay protection such as VHS V2.0 Slapper Tape and neoprene wraps. These also serve the purpose of noise reduction through damping chain slap.
For the rest of this guide, we'll focus on full frame protection kits, although some of the points still apply when installing adhesive-backed frame protection.
What do I need to apply mountain bike frame protection?
The list of things you’ll need to start the application process is simple and can be bought at most supermarkets or even online. Each item on this list is imperative for a quality fit so make sure you get the right gear before you start. That said, some tools such as a squeegee, for example, will come with some kits.
- Mountain bike frame protection kit
- Fresh, clean micro-fibre cloths
- Baby shampoo
- Surgical spirits, methylated spirits or isopropyl alcohol
- Squeegee
- Workstand
- Clean and preferably dust-free work area
-
Spray bottle
Mountain bike frame protection - installation
Installing a frame protection kit is a simple but time-consuming task so make sure you’ve got a few hours booked in to get the job done. It’s also important to keep a cool head and take a slow but methodical approach; this can be quite a frustrating effort.
Also, if this is your first time applying a kit and you’ve had no experience in doing anything similar, it’s best to expect a bubble or some trapped dust here or there when you’re done. This is something that gets easier and is finished to a better quality with practice. This is why, if you’re not confident, it’s best to take your bike to an experienced mechanic.
1. Prepare your work area
It’s best to work in an area that’s as clean as possible. This is to ensure that no dust or dirt particles find their way in between the protective films and your bike’s frame.
You’ll then need to prepare your spray bottle and this is where the baby shampoo comes in. The idea of adding baby shampoo to the water in a spray bottle is that you’ll spray the solution onto your frame and the protective sheets to delay the adhesive bonding to the frame. We recommend adding a couple of drops of shampoo to your water but you can add more if you want a little more time to position the film.
While a protection kit can be applied to a fully built-up bike, it’s best to at least remove the wheels to access the inside of the rear triangle. Better still, disassembling the frame as much as possible gives you much more space to work around.
2. Clean the frame
Next, use your isopropyl alcohol (or similar) and micro-fibre cloths to thoroughly clean your frame. This removes any grease or oils left after handling the frame with your bare hands. This also poses a great opportunity to remove any lint or dust that may have found its way onto your frame.
Neglecting this step can stop your frame protection kit from adhering properly, resulting in a messy look once the job is done, or a few rides down the line.
3. Wet the area
With a clean frame, it’s time to wet the first area for application. Then with wet hands (damped with the spray you’ve concocted) peel off your chosen panel and spray the adhesive side.
4. Place your panel
Now, gently place your chosen panel to the correct part of your bike. At this point, it’s best to avoid using the squeegee (for now) and try to apply as little pressure as possible because we don’t want full adhesion just yet. Instead, this will give you an opportunity to line up the protective sheet accurately. Once happy, you can press the centre portion of the panel to hold it in place.
5. Squeegee water away
With the panel stuck gently in a good spot, you can now squeegee the panel, starting from the centre and outwards. This makes the bond between the protective panel and your frame more permanent as you squeeze the baby shampoo/water solution from under the sheet.
This part of the job can be likened to putting a protective film on your phone screen and the process is almost exactly the same - except for the challenge of the curved areas.
It’s best to do this slowly but methodically and thoroughly. As the panel reaches the edge of the frame, carefully squeegee it around, pushing the squeegee away from the centre of the panel.
Once this is done, dry the area. You may find that there are some edges that haven’t stuck properly but don’t worry about those yet.
6. Finish the rest of the frame
It’s now just a case of rinse and repeat. On larger panels, it’s useful to get a friend involved to help you line the sheets up properly and make sure they stay in place as you squeegee them.
7. Dry the frame and stick down the edges.
With the bike fully wrapped, give your frame a dry. This is when we turn our attention to those edge areas that haven’t stuck properly. The reason why they haven’t stuck is that water often sits here, stopping the adhesive from sticking properly. Once dry, it’s free to do its thing.
8. Leave your frame
Now you’re frame protection kit is properly applied you’ll need to leave it for around 24 hours to let the adhesive bond properly. Once the time’s elapsed the job is officially done and you can get building your frame.
Tips to make installing frame protection easier
Work in a warm environment
With a bit of warmth, the frame protection’s material gets more malleable which can be a godsend when applying to a particularly curvy frame.
Spray baby shampoo/water to peel away sections
If you need to make small alterations on a stuck piece, but have a section left to stick, spray your baby shampoo/water solution underneath the panel to help pull it away from your frame. You can then adjust its positioning slightly.
Use a hair dryer to bond non-sticking edges
Blasting any tough-to-stick- edges with a hair dryer will warm up the adhesive and make it easier to stick to the frame. It’ll also completely dry localised areas, making the finishing touches even easier to wrap up.

